|
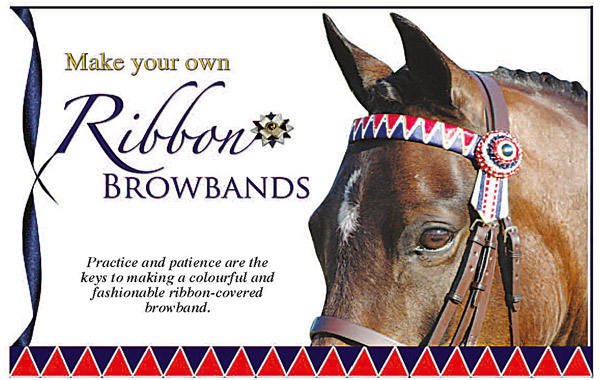
The subject of how to make a ribbon-covered browband is obviously a popular one amongst Hoofbeats readers as, since we last published instructions for doing this in 1999, Vol 21 No 2, there has been a constant demand for back copies of this particular issue - so much so that it is no longer available. As fashions in the showring are constantly changing, the decision was made to reprint an updated version of how to go about making a basic ribbon browband with rosettes and flags that is suitable either for everyday use or, if made with care and precision, the show ring.
Colour and Material Selection
Before purchasing the supplies needed to make the browband described in this guide, it’s wise to give some thought as to which colours will best suit the overall picture of horse and rider. As a general rule, a browband constructed from lighter colours will look more attractive on a dark-coloured horse (such as black, brown, steel grey, liver chestnut or dark bay) with a small amountof white, while those with a large amount of white on the face or a light-coloured coat (grey, chestnut or palomino, for example) are better suited by a combination of darker ribbon colours with very little white.
Obviously, this can be taken a step further by selecting ribbon colours that pick up those also used elsewhere in the rider’s outfit such as the tie, waistcoat, shirt or hair ribbons. As with all areas of fashion, however, care must be taken to ensure that the coordinated effect remains subtle and pleasing to the eye, rather than too bright and gaudy.
For the browband described in this article, two 3m in length/15mm in width ribbons (purchased from a Spotlight store) have been used but, as your skills improve, ribbons of varying widths can
be added to create a more colourful effect. Especially if lighter colours are to be used, a browband made from PVC is a good choice as, if the finished product ever becomes wet, it shouldn’t discolour the ribbons as much as a leather one might.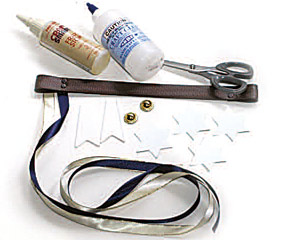
MATERIALS
Plain flat leather or PVC browband
Two lengths of 15mm ribbon in contrasting colours – each 3m long
Extra 1m of each ribbon colour for flags and rosettes
Craft glue or Superglue
Scissors
Thin cardboard
Two decorative buttons
Large needle and nylon fishing line
Stanley knife
‘Craft Smart’ Fray Stop
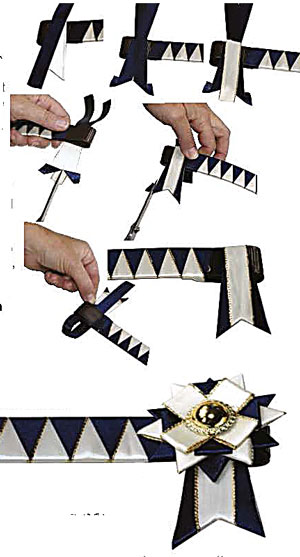
METHOD
The following instructions are for a right handed person, who will work from left to right, however the same pattern can be achieved by a left-hander working from right to left. Keep a firm tension on the ribbon at all times and line the edges up neatly as you go to achieve a professional result.
STEP 1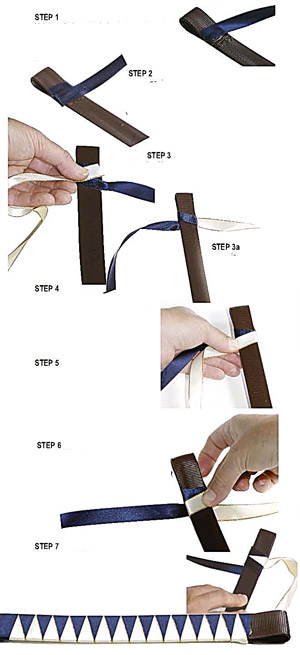
Using craft glue, attach the darker-coloured
of your two ribbons to the back of the browband
- as close to the loop as possible - with the length
running off to the right hand side.
STEP 2
When dry, flip the browband over and hold it
upright. Then wrap the attached piece of ribbon
firmly on an slight angle (approx 10 to 15 degrees)
over the front of the browband and around to the
back, so it meets edge to edge with the first
strip. The excess will now run off to the
left of the browband.
STEP 3
Holding the dark piece of ribbon firmly with your thumb, glue the light-coloured ribbon across the dark ribbon on the back of the browband, with the excess running off to the left.
STEP 3a
When that is dry, turn the browband over to begin the pattern.
STEP 4
Holding the dark ribbon firmly with your thumb and first finger, cross the light ribbon over the dark from right to left on an angle (as shown in the photo), so both ribbons are on the left of the browband.
STEP 5
Place your right thumb on top of the light ribbon, with your first finger on the back of the browband, then wrap the light ribbon under the dark one, continuing the angle of the first wrap and working to the right of the browband.
STEP 6
While holding the back of the browband firmly with your first finger, cross the dark ribbon over the light on an angle and wrap it under, lifting the light ribbon at the back of
browband aside and taking the dark ribbon to the left.
STEP 7
Continue on in this pattern until the browband is covered. It should look the same on the front and back if done correctly. Then simply glue down the ends of each ribbon on the back of the browband and cut off any excess.
ROSETTES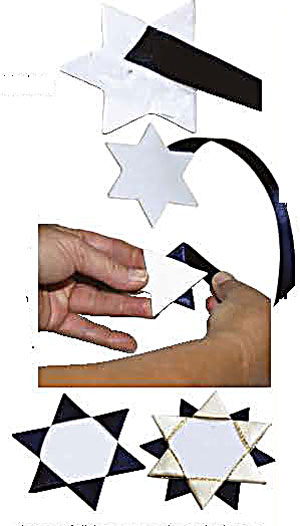
Rosettes are the harder to master, so this is a very simple design for beginners.
STEP 1
Cut out four, six pointed stars from the cardboard. Cut each ribbon into 25cm lengths. For the first star, glue one piece of the darker-coloured ribbon onto the back of the cardboard shape across a point. When dry, wrap this ribbon around three points then glue down the end on the back. Repeat with another section of dark ribbon
on the other three points so the cardboard star is completely covered with dark ribbon. Cover another star in the same way with dark ribbon, then cover the remaining two stars with the other colour.
STEP 2
Glue the covered stars together in pairs(one dark/one light) so you now havetwo, 12 pointed stars in alternate colours.
STEP 3
To fill in the middle of each star, cut small pieces of ribbon approximately 4.5cm in length, fold them in half then glue each end to form loops. When these are dry,
glue them in layers to the centres.To finish off, attach a button to the centre of the loops with glue or a large needle and a piece of nylon fishing line. Make two
small holes through the middle of the rosette and thread the nylon line through the button loop then the two holes, tying it off at the back.
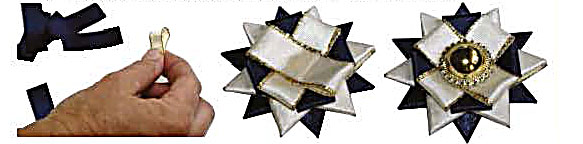
FLAGS
To make flags, cut out the desired shape from
cardboard and, using craft glue, attach them over the
loops at each end of the browband. Using left-over
ribbon and craft glue, stick sections of contrasting
colours over the flags on both sides and any parts of
the browband loops that will be showing once the flags
and rosettes are in place.
Trim the edges with a sharp Stanley knife and, if desired,
apply some Fray Stop (a craft product) to the edges
of the ribbon to stop them from fraying.
FINAL ASSEMBLY
Using craft glue, attach the rosettes to the top of the
flags, making sure they are centred on the browband
and are covering the loops at each end.
There are numerous other patterns that can be used for
making ribbon browbands, with some being quite intricate
and complex. This basic method, however, is a good starting
point for creating an individual and colourful look for very little
cost |