|
step 1: assessing a wound
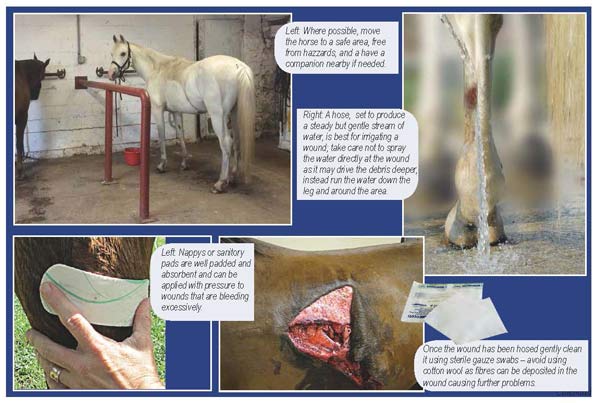
In the case of an injured horse, the first step taken should be (where possible) to move the horse to a safe area that is free from hazards, distractions and other horses - unless the animal is stressed when isolated from herd/stable mates, in which case it may be prudent to bring along another horse as a buddy if it is safe to do so and they can be controlled.
The owner can then take a proper look at the wound, keeping in mind that sometimes a wound may initially look minor but in fact be very serious, with significant damage to the internal structures (as in the case of puncture wounds and wire wounds). The level of lameness the horse exhibits can also be misleading and is not an accurate way for owners to determine the true nature of an injury.
Any wound below the knee or hock that fully penetrates the skin should be seen by a veterinarian as it most likely involves internal structures, however if there is any doubt at all, a veterinarian should always be called. If the horse is distressed or agitated and won’t stand calmly, a vet can use sedation if necessary to allow assessment of the injury and any treatment to be applied safely.
step 2: cleaning a wound
In order to see the wound properly, it and the immediate surrounding area should be cleaned in the first instance in order to remove any visible blood and debris (such as dirt and hair) and minimise the bacterial load. If the wound is actively bleeding, direct pressure should be applied using an absorbent material (nappies or sanitary pads are ideal in this scenario).
Generally a hose, set to produce a steady but gentle stream of water, is best for irrigating a wound; take care not to spray the water directly at the wound as it may drive the debris deeper, instead run the water down the leg and around the area. Proceed with caution when doing this – a stressed horse (or one in pain) may react negatively to water aimed at a tender spot! Start as low as possible (e.g. the hoof) and work slowly upwards.
Once the wound has been hosed and an initial assessment made the wound can be gently cleaned using sterile gauze swabs – avoid using cotton wool as fibres can be deposited in the wound causing further problems.
First Aid Kit- Wound Cleaning Solution
The solution used to clean the wound is important – disinfectant scrubs (e.g. Chlorhexidine Scrub 4%) should not be used as the detergent component of these can damage the tissues further and prevent healing, however, a Chlorhexidine solution diluted to 0.05% is an acceptable flushing/cleansing agent. Alternatively, 1% povidone-iodine solution may be used which is an antiseptic, or sterile saline that mechanically removes bacteria from the wound but has no antiseptic properties.
Always work in an outwards circle, or from top to bottom, going from the cleanest section of the wound to the dirtiest so as not to contaminate it further.
In the case of soft tissue injuries it is best to consult with a veterinarian on what level of treatment is required, such as topical treatments, surgical debridement, bandaging, the administration of systemic antibiotics or simply keeping the area clean. Debridement is the removal of dead tissue; the body does this naturally to some extent as part of the normal healing process, via white blood cells and enzymes, however sometimes the veterinarian will need to do this surgically by cutting away the dead or dying tissue using a scalpel, to promote healing in cases where there is a large amount of dead tissue present.
Some wounds are suitable for what is known as ‘primary closure’, that is they are stapled, glued or sutured, whilst others, for example, puncture wounds or wounds that are grossly infected, require being left open so they may fully drain.
 step 3: determining if a bandage is required step 3: determining if a bandage is required
Bandaging prevents further trauma to the area in question, controls bleeding, reduces the risk of further contamination and can help stabilise or immobilise an area, for example, if the wound is directly over a joint, the joint may need to be managed in such a way as to minimise movement and thus further injury to the area. It also allows a topical dressing to remain in contact with an injured area, and the pus/exudate which can contain important biological products essential for healing. Unfortunately for equines, the delicate lower limb is an area in which healing is somewhat hindered due to a lack of underlying tissue, a poor blood supply and the difficulty in preventing movement.
Bandaging is not always advised; some studies have demonstrated that bandaging may promote the formation of ‘proud flesh’.
This is something the veterinarian will take into consideration when devising a management plan for the horse. If proud flesh arises, it often requires surgical removal.
When indicated, bandaging the lower limbs of horses is a common and simple task, however applying a dressing to an area of the body above the elbow or hock becomes rather more challenging.
step 4:
when a dressing is required
Bandages are often applied in three layers. An important consideration when using any type of bandage on the limb of a horse (whether injured or not) is the amount of tension applied – too slack and the bandage may slip, exposing the injured area to contamination - too tight and there is a risk of causing pressure points, compromising the circulation to the affected area, delaying healing and causing further damage such as damage to the tendons, creating a ‘bandage bow’. Sufficient padding and a bandage applied in an even manner is essential.
Wherever possible, have an assistant organised to hold the horse so that it remains calm and as still as possible – this will help ensure the bandage is applied evenly without being overly tight, and also allows for the task not to be rushed. It may be necessary for the assistant to hold another leg up on a fidgety horse that doesn’t want to stand still!
Lay out all of the necessary bits and pieces on a clean, dry area prior to beginning dressing the wound – once the first layer is applied (especially if working alone) it is very difficult to leave the horse to retrieve the next piece of equipment! If the injury is to a hind limb, it is helpful to ensure the tail is out of the way before starting.
Primary Layer Dressing
Once the wound has been cleaned and dried the primary bandage layer can be applied – this is a non-stick, sterile dressing (such as Melolin). It is important that a non-stick product is used since when this is removed later on it will not damage/remove any healthy new tissue that has formed underneath. The primary layer can be used to deliver a topical treatment and there are many wound products available for use in horses. Hydrogels are often favoured as they provide moisture to aid in the healing of dry wounds, whilst also absorbing any exudate (seeping from the wound). Wounds that are kept moist heal faster and are less likely to become infected. Examples of hydrogels include IntraSite Gel and SoloSite Gel. Historically, honey has also been used to assist with the healing of open wounds in horses, however there is a lack of conclusive evidence as to how it exerts a beneficial effect.
Sometimes wet-to-dry bandages may be used. This is where the primary dressing is moistened with sterile saline so that wound exudates are diluted and then absorbed into the second and third bandage layers. The primary layer then dries and sticks to the wound. Whilst wet-to-dry bandages are effective in removing dead tissue there are disadvantages. For example, the wound dries out, which is not ideal for healing – a moist environment is best and healthy tissue also sticks to the gauze and is removed with the dressing, which can delay healing.
Secondary Layer Dressing
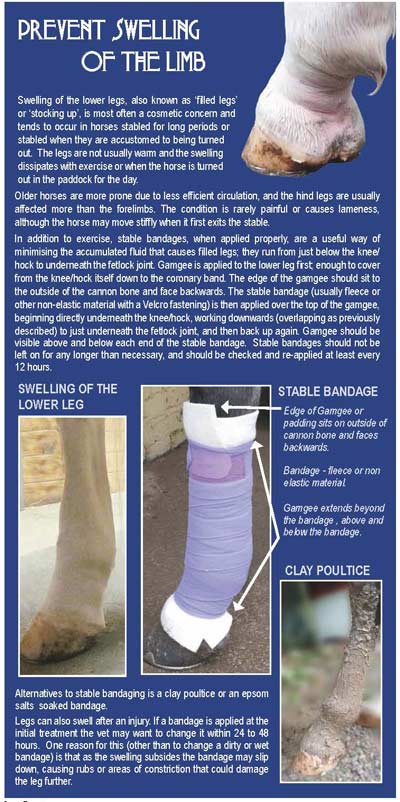
The secondary layer is applied next; this provides the ‘padding’ of which two or three centimetres depth is ideal. If the wound is still bleeding this needs to be an absorbent material. Examples include gamgee, cotton roll or cotton combine, which is a wound dressing consisting of an absorbent thick layer of fleece enclosed in non-woven fabric. Once wrapped around the limb, the edge of the material should sit on the outside of the cannon bone, facing backwards.
Third or Tertiary Layer Dressing
The third layer is added to provide compression to minimise any swelling – this is an elastic cohesive bandage such as Vetrap® or Tensoplast®. Normal stable bandages such as polo/leg wraps are generally too soft and stretchy to be used to secure wound dressings.
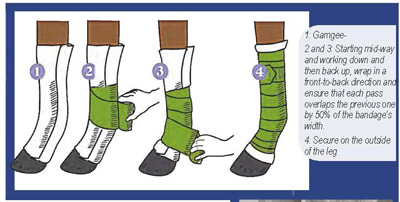
Starting mid-way down the secondary layer, and working down and then back up, wrap in a front-to-back direction and ensure that each pass overlaps the previous one by 50% of the bandage’s width, so an even pressure is maintained. When applying tension to the bandage, this is done as it is pulled around and over the front of the limb to avoid exerting too much pressure on the tendons running down the back of the limb. Always ensure that an inch or so of the secondary ‘padding’ layer (i.e. the cotton roll/gamgee/combine) is visible above and below the ends of the elastic cohesive bandage so that pressure points and sores do not develop; be on the lookout for any swelling above or below a bandage applied to the lower limb.
When dressing a wound on the cannon bone it is imperative that the bandage is taken down below the fetlock, and for a foot/pastern wound that the bandage travels above the fetlock, as pressure sores can easily develop here due to bandages riding up from the coronet or down from the cannon. Some owners prefer to finish off by applying a small amount of tape (e.g. duct tape) to the final edge of the cohesive bandage to prevent it unravelling. Do not begin or end a bandage over a joint; the movement in this area can cause the bandage to become loose and slip. If the wound itself is on/near a joint seek veterinary advice regarding bandaging this area as it is easy to cause more damage.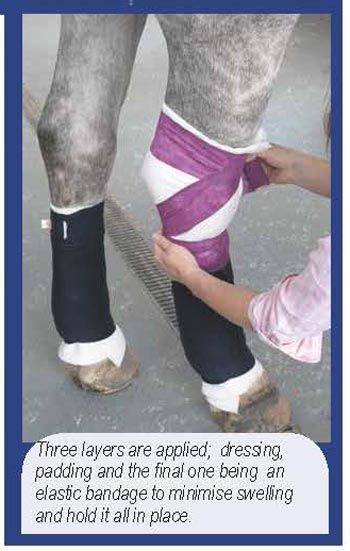
The length of time between dressing/bandage changes is dependent on the wound and can vary from often as twice a day (in the case of a heavily infected wound producing a large amount of exudate) to as little as once or twice a week. A variety of different dressings may be used as healing progresses. When cleaning and re-dressing a wound, always observe whether there is any swelling or infection present that may indicate re-evaluation of the wound is needed. Hosing the area at each bandage change in the early days will help limit swelling and discomfort (ensure the area is fully dry before re-applying dressings).
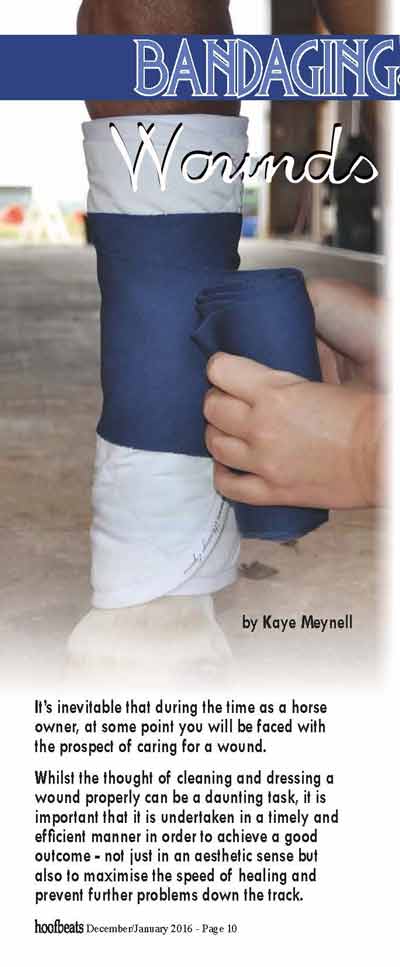
Dressing and bandaging wounds on horses should be undertaken in a timely manner wherever possible to ensure the best possible outcome. By using the correct materials and bandaging techniques, owners can set themselves and their horse up for success! Whenever possible, practice bandaging different areas of a (healthy) horse’s limbs to be familiar with the correct technique prior to having to do it on an injured and stressed horse. Have a veterinarian demonstrate the correct method (including tension) at their next routine visit.
|